
Creating and Maintaining Distribution Lists
- operations16
- Mar 1, 2024
- 6 min read
Updated: Mar 10, 2025
ChilliDB users are able to utilise the Distribution Lists module to manage their
communications with contacts/organisations with regards to memberships, newsletters and other bulk messaging purposes. Before adding your contacts/organisations to a distribution list, that list needs to be created in the system.
Note: Users wishing to integrate existing Mailchimp distribution lists with ChilliDB should read this article.
Creating a New Distribution List
To create a new distribution list, navigate to the Utilities main menu item and then select
'Distribution Lists - Create' from the drop down menu.

The next screen prompts you to choose a categorisation for your distribution list.
Note: if the category you require for your new distribution list is not available, see this article for information on how to create new categories for modules in ChilliDB.
You are then prompted to name your list; choose whether contacts or organisations (or both) will make up the membership of this list; and allocate a sensitivity to the distribution list - this refers to which roles in your organisation can view the list. If no sensitivity is required, simply leave the list set at the default, which is ‘None’. Otherwise, click on ‘None’ to allocate sensitivity settings to the list - this will restrict the viewing of the list to certain roles.

Once all the required information has been entered, click ‘Save’. The next screen displays the details of the distribution list that you have just created. If you wish to make changes to the list, you can click ‘Edit’ in the top-right hand corner of the screen. Otherwise, you can start adding Members to this list by clicking on the ‘Create’ button under the Members tab.

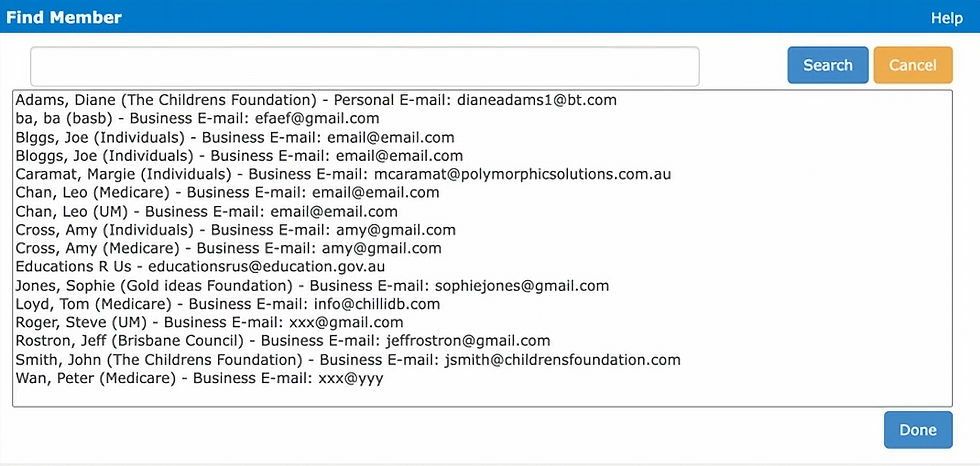
If adding members to a distribution list, the next screen displayed is as below. To look for contacts/organisations that you already have in your ChilliDB CRM, type their name or part thereof in the search box and click ‘Search’. Alternatively, just clicking ‘Search’ without entering any data reveals all of the results available to you in your ChilliDB.

From the list provided by your search terms, choose the relevant contacts you wish to add to your distribution list, and then click ‘Done’.
The chosen contacts will now appear on the distribution list details page under the ‘Members’ tab.

Note: See end of article for how to add contacts/organisations to distribution lists from their respective modules.
Users also have further options available to them on the details page in terms of working with the distribution lists created. The options are accessed by clicking on the ‘Actions’ menu, also located in the top-right hand corner of the page.

The Actions available to you via this menu are as follows:
i) Show Member Details: Lists member’s names and email addresses in a text box (format allows you to copy and paste them if you wish to).

ii) Manage sensitivity: allows you to restrict access to particular distribution lists to certain roles within your organisation. This is the same function available to you when you first create a distribution list in the ‘Sensitivity’ field.
iii) Create Quick Link: creating a quick link for a distribution list enables users to access the list by simply clicking on the ‘Links’ tab that runs down the right-hand side of the screen and then choosing the appropriate item.


iv) Tab Management: this option enables users to reorder the tabs associated with the Distribution Lists details page. To do so, click on ‘Tab Management’ and then change the order using the numbers in the drop down boxes. If you wish to restore the default settings, you can come back to this page at a later date and click ‘Restore Default’ to do so.

v) Distribution List Tabs
Within a distribution list’s Tab section, you will find default tabs that offer comprehensive control over your distribution list: Members, Unsubscribed Members, Notifications, Roles, Subscription Rules, and Statistics.
vi) Members: In the Members tab, you can access the entire list of distribution list members. Should you need to expand the list, the Create button allows you to add new members. Upon clicking this button, a search window will appear, enabling you to find and add desired members.
vii) Unsubscribed Members: The Unsubscribed Members tab presents a comprehensive rundown of members who have opted out of the distribution list. You will find their details, along with the reasons and sources for their unsubscribing. To unsubscribe a member from the distribution list, simply navigate to the respective contact or organization, proceed to the Distribution Lists tab, and select on the "Unsubscribe" option.
viii) Notifications: The Notifications tab allows you to set up various alerts, including regular alerts or email alerts, whenever there are changes to the distribution list or when new members are added or unsubscribed. The Notifications tab allows you to add roles, and these roles become recipients of alerts related to the distribution list. These roles can be easily created and maintained from the System > Users > Maintain Roles + tickets section, ensuring that the right stakeholders stay informed about important updates within the distribution list.
ix) Subscription Rules: The 'Subscription Rules' tab empowers you to automate the process of adding members to the subscribed list based on specific conditions. By setting up subscription rules, you can define criteria such as certain values in Contact or Organization fields. When any contact or organization meets these conditions, they are automatically added to the distribution list's subscribed members list.
x) Roles: Within the Contact and Organization module, you can assign specific roles to individual Contacts or Organizations. Once roles are designated, you can utilize them in the Distribution List tabs. By selecting the relevant Roles, any Contacts or Organizations associated with those Roles will be automatically added to the distribution list. Creating and managing these Roles is straightforward through the System > Reference Data > Create and Maintain > Contact Role Categorization section.
xi) Statistics: The Statistics tab offers visualizations that provide valuable insights into the distribution list's growth and engagement by displaying data on new subscribers and un-subscribers for your selected time period. You can choose between different time intervals, such as 12 months, 30 days, or 7 days, to observe trends and changes in member activity over those periods.
Maintaining Distribution Lists
Once distribution lists have been created, a user can return to them to view/edit them or update details by navigating to the Utilities main menu item and selecting ‘Distribution Lists - Maintain’ from the drop down menu.

The ‘Display Distribution Lists’ screen lists all of the distribution lists available to you in your ChilliDB system. However, you are able to filter results in the top left-hand corner of the screen by choosing between ‘Show Current’ (displays all lists available) and ‘Filter’ (user can filter distribution lists according to their categorisation).


When a user has located the distribution list they are looking for, ChillDB gives them a number of options for working with the list:
1) Clicking on the distribution list name under the 'List Name' column heading takes them to the distribution list details page. Once there, all the options outlined in the ‘Creating a Distribution List’ section above are available to them.
2) Selecting 'Show' under the 'Member Details' column heading produces the same list of contact names and email addresses as mentioned in the ‘Creating a Distribution List’ section under the Distribution List details page ‘Actions’ menu.
They can create a new distribution list from this page as well by clicking on the ‘Create’ link on the top right-hand corner of the page.
Maintaining Unsubscribe Options
To set up/edit the messages pertaining to distribution lists unsubscribe options in ChilliDB, navigate to the Utilities main menu item and then select 'Distribution Lists - Unsubscribe Options - Maintain'.

This section allows users to choose/modify the templates associated with the message members see when they unsubscribe from a distribution list. Users are able to choose from three default options, which they are unable to modify. However, if they wish to personalise the message, they can change ‘Content Type’ from ‘Default’ to ‘User Customised’ to access editing mode for any of the templates available. This grants them the ability to change any aspect of the template, including the mail merge tokens used.
Once a user is satisfied with the template they have chosen/created, click ‘Save’ to implement this template as your user unsubscribe message.


Comments