
Using Survey Templates
- operations16
- Jan 30, 2024
- 3 min read
Survey templates allow users to customise the appearance of their surveys for program activities or business groups, or even just for their organisation in general. It is possible to have as many templates as are necessary, and users can control the presentation of the header and footer content; and all other major elements of the survey, such as questions; labels; sections; layouts and so on. Survey Templates are accessed via the Surveys main menu item.

The Survey Templates page allows users to see all of the templates in their system, or select the 'Create' link to create a new one.

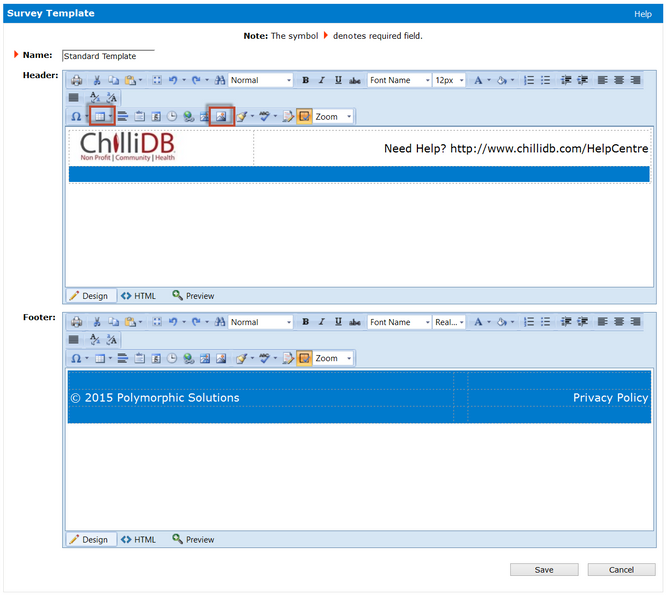
Give the template a Name, and then the first elements to be defined are the Header and Footer. The rich text editor can be used to style content in the Header and Footer. It is a good idea to insert a table to help layout images and text within the Header and Footer. If users set the Table width to '100%' then it will span their survey nicely.
In this example, we have defined a table in both the Header and Footer sections, and we are using table background colours to provide separation of these elements from the surveys they will be used on. Images should be inserted using the Image Manager on the editors’ toolbar. Then images can be reused, and users can be sure that the images are available to the recipients of their survey.
The Table button and the Image button have been highlighted in the editor’s toolbar in the image below. If users hold their mouse over the toolbar buttons, they can use the tooltips to remind them of the purpose of each button.
Note: users can leave their Header and Footer blank if they choose, however it makes sense to include some content in them to apply some consistency to all of their surveys.
Once happy with Header and Footer content, the template can be saved using the 'Save' button.
Next, users will be able to view the individual Styles attached to the elements that will make up their survey. They can edit the header and footer from here, or move onto editing the other styles.

Clicking on each style will reveal a pop-up editor with options which users can customise for the elements outlined in the following table.
Style | Purpose |
Default | This is the base style for all text which will appear on the Survey which is not covered by other styles defined here. |
Layout | Layouts allow you to group similar fields on a form, and any Questions you place into that Layout will render in a bordered container. This works well when you have different sets of data you are looking to collect on the same Survey – e.g. Contact Details, Organisation Details, Service Availability Details, and Suburbs Service is Delivered etc. Note: Layouts refer to the container as a Fieldset, so you will see that when managing this Style |
Header or text -Header 1 | This is used to control the look of all Headings on your Survey. You can have three levels of headings. |
Header or text - Header 2 | This is used to control the look of all Headings on your Survey. You can have three levels of headings. |
Header or text - Header 3 | This is used to control the look of all Headings on your Survey. You can have three levels of headings. |
Header or text - Text | This is used to control the look of page text on your Survey. This is useful for providing information to your Survey responders or guidance. |
Question | This is used to control the look of all Question text. |
Question Group | This is used to control the look of all Question Group text and layout of the question group borders. Question Groups are Questions which present matrices of related Question and Answer options. |
Section | Sections are similar to Layouts, in that they too will allow you to group similar fields on a form. However, Sections allow you to break your form up into different screens, so if you wanted to capture different sets of data on separated screens like a wizard, you could use a Section. |
For any style, users can control all of the visual attributes. The are given a sample of how the styling will appear at the bottom of the window while they edit it.

Once happy with the created template, users can move on to creating a survey.


Comments