
Creating and Maintaining Events in ChilliDB
- nmonds
- Mar 1, 2024
- 6 min read
Updated: Mar 25, 2025
ChilliDB’s Events module enables users to create events for staff and clients. It features multiple functions that allow users to manage the many aspects involved in setting up and staging events their organisation holds, including the creation of the event; management of upcoming events; and the mailing out of event certificates upon completion.
Creating an Event
To create a new event in ChilliDB, navigate to the Events main menu item and select ‘Create’ from the drop-down menu.

On the next screen, enter the details of your upcoming event in the fields provided.
Note: Remember, if the event categorisation you require is not available in the drop-down list, you are able to create your own categorisation(s). To see how to do this, click on this link.

When entering the details of an upcoming event, users will be prompted to select a product in the ‘Price’ field if they have answered ‘Yes’ to the question ‘Do you charge for this event’. If this is the first time they have run an event of this kind, and they need to create a new product that reflects the correct pricing structure, they can do so by following the steps below:
Click on ‘Select Product’.
If the product/pricing structure you’re looking for does not already exist, click on ‘Create’ in the top-right corner.

Enter the details for the new product you wish to use for this event, and then click ‘Save’

If a user selects the ‘Use Sessions’ option to allow them to create multiple sessions for the one event, they will be prompted to add these sessions once the event details are completed and the event is saved.

When all the details are as you wish on the event creation page, click on ‘Save Event’. This takes you to the Event Details Overview page. If you have chosen to create sessions, this is where the 'Sessions' tab will be visible. To add the sessions for this event, click on ‘Create’ in the right-hand corner of the sessions window.

This reveals a pop-up window where users can enter the details of the first session and then click ‘Save’ to list that session under the ‘Sessions’ tab.

The easiest way to create more sessions for the same event is to click on the session you have just created, choose ‘Create Like’ from the Actions menu, and then modify the date and time to reflect the details of the new session.

This can be done as many times as necessary until you have all of the desired sessions listed for your event.

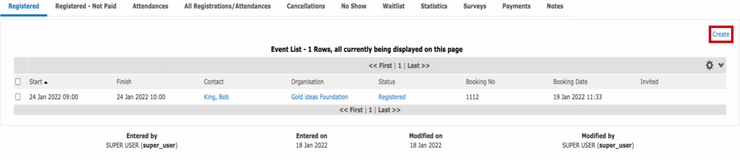
At the bottom of the Event Details Overview page are 11 tabs that allow you to work with the event you have just created in a number of ways. The first of these is the ‘Registered’ tab:
Registered: Under this tab, users can create entries for people who have registered for this event and paid. To make an entry, first click on the ‘Create’ link on the right-side of the page just below the tabs.
On the next screen, users will be prompted to add the relevant information for the attendee they are registering. Once done, click ‘Save’.

If users have checked the ‘Send Event Invitations’ box, the next screen will prompt them to confirm the attendee’s email address in preparation for them to compose an invite message to be sent. If this box is left unchecked, users will be taken back to the Event Details Overview page.

If these details look correct, clicking ‘Continue’ takes users to the next screen where they can compose and send their invitation.
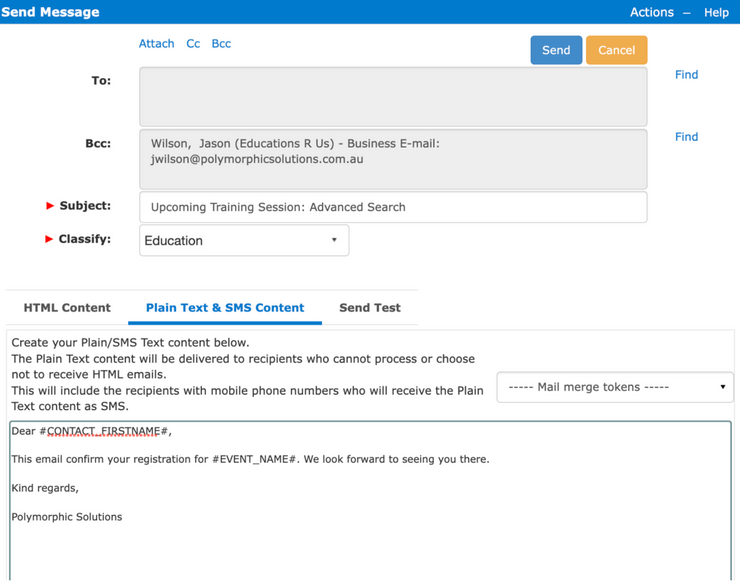
The Send Message screen in Events also features options to work with the message you are creating in different ways. These options can be accessed by clicking on ‘Actions’ and choosing the appropriate option.

Once an invitation has been composed and sent, users are returned the Event Details Overview page where any changes are reflected under the corresponding tab - in this case ‘Registered’.

Of the other tabs available to place attendees in in the Event Details Overview section, ‘Registered - Not Paid’; ‘Attendances’; ‘All Registrations/Attendances’; ‘Cancellations’; ‘No Show’ and ‘Waitlist’ all function in much the same way as the ‘Registered’ tab. Users can switch an attendee’s status between these tabs by hovering over the ‘Actions’ link on the top right-hand side of the Event Details Overview section and choosing ‘Manage Registrations’ - ‘Change Registration Status’.

The next screen prompts users to make the necessary changes to attendees. The first step is to find the attendee(s) whose status you wish to change by choosing their current status from the drop-down menu. Next, users choose the appropriate attendee(s) from the list presented. The final step is to choose the status you would like to change them to from the drop-down menu at the bottom of the screen. Once you are satisfied with the changes you have made, click ‘Update’.

Any changes made to attendee’s status will be reflected under the appropriate tabs in the Event Detail Overview section.

The last four tabs on the Event Details Overview screen allow users to collate feedback for particular aspects of an event (Statistics); view event survey results (Surveys); gain an overview of payments made for an event thus far (Payments); and create notes for the event (Notes).
Event Details Overview Page: Actions Menu Options
In addition to the aforementioned ‘Change Registration Status’ option presented under the ‘Actions’ menu that allows users to change an attendee’s status (and thus move them between the tabs at the bottom of the Event Details Overview page), there are other options available to users from this menu that present them with a number of alternatives for working with the event and its attendees. These options are as follows:
1. ‘Create Like’: creates a duplicate of the event details displayed so a similar event can be run in the future - all that is required is a change of the dates to reflect the date of the new event.

2. ‘Manage Registrations’ - ‘Add Multiple Registrations’: allows users to add more than one person at a time to an event and to choose the relevant status for those people as they are added. Once you have selected the appropriate ‘Status’ from the drop-down menu and chosen the contact(s)/organisation(s) you wish to add, click ‘Save’.

3. ‘Manage Registrations’ - ‘Full Attendee List’: by selecting this option, users can gain an overview of those currently registered to attend and their status. They can also print/export the list if required.

4. ‘Email Attendees’ - ‘ Email Certificates’: allows users to send certificates to attendees after the event is complete.

The first step is to choose the status of the attendees you wish to send the certificate to and the type of certificate you are sending. You also have the option to store this message as a note against each attendee’s name under their contact/organisation details page. Then click ‘Continue’.

On the next screen confirm the recipient(s) details are correct and click ‘Send’.

5.‘Email Attendees’ - ‘Email Online Survey’: provides the option of sending out post-event surveys to attendees if desired.

Simply select the status of the attendees you wish to send your survey to and then search for the survey by typing its title (or part thereof) in the ‘Survey’ search box and selecting the survey category from the drop-down box. Then confirm the attendee’s details are correct and click ‘Send’.

6. ‘Email Attendees’ - ‘ Send Message’: using this option, users can send messages out to all attendees/attendees of a certain status.

As with the ‘Send Event Invitations’ option when adding attendees to an event, users will then be asked to confirm the attendees’ details they are sending the message to. Once they have done this and hit ‘Continue’, they are able to compose and send their message on the next screen.
7.‘Reports’: This action allows users to generate Event Certificates; Attendee Signatory Sheets; and Name Tags for an event.

i) Example Event Certificate:

ii) Example Signatory Sheet:

iii) Example Name Tags:

Event Search Function
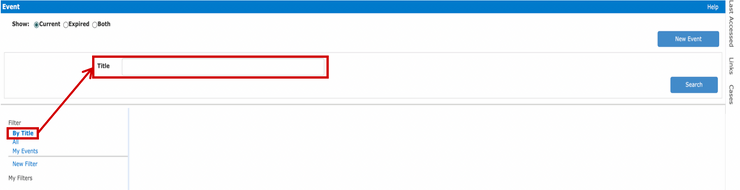
Once an event has been created, it can be easily located again for editing/maintenance purposes by navigating to the Events main menu item and selecting 'Search' from the drop-down menu.

On the next screen, users are presented with a number of filters to aid them in their search for specific events. These filters are as follows:
i) By Title: with this option, users are provided with a search bar to type the title of the event they are looking for.
ii) All: this options results in all events entered in the user's organisation's ChilliDB system being revealed.

iii) My Events: reveals the events the user has created in the system.

iv) New Filter: allows a user to create their own search parameters by selecting filters associated with the various fields related to events.


Comments