
A Guide to Standard and Advanced Data Loader
- Bibidh
- Jan 22, 2024
- 4 min read
Updated: Feb 10, 2025
ChilliDB offers a solution for importing external CSV, XML, XLS, or XLSX files into various modules like Contact, Organisation, Note, Client Administration, or custom modules. This process is facilitated using the Data Loader, which provides users with seamless data integration capabilities. To cater to different user needs and scenarios, ChilliDB offers two distinct methods for data import: the Standard Data Loader and the Advanced Data Loader.
Accessing the Data Loader
The users can access the Standard Data Loader when they possess the appropriate data loader user ticket. To begin the import process, navigate to the Data Loader menu under System > Data Management.

Importing Data with the Standard Data Loader
The Standard Data Loader can be used to import data to Contact and Organisation modules. Upon selecting the Data Loader option, ChilliDB will redirect users to the Standard Data Loader page.
1. Choose the Module: Depending on user’s specific requirements, opt to import data into either the Contact or Organisation module.
2. Upload the Data: Click on the "Choose File" button to browse and select the desired CSV, XML, XLS, or XLSX file from the computer.
Note: If CSV file is being used to import the data, please refer here for best practises on the format.

3. Match Field from File with ChilliDB Field: Click on Load Field Names to associate the appropriate columns from the uploaded file with the corresponding fields in the Contact or Organisation module.

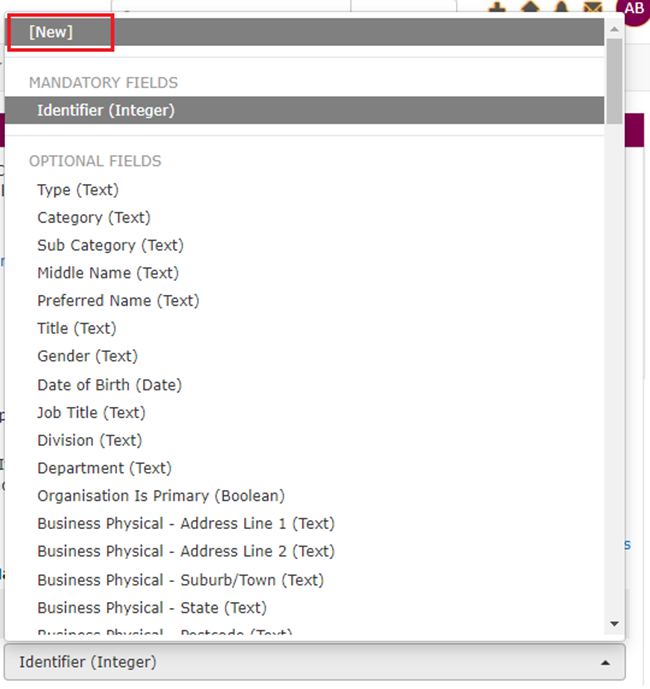
Note: In case the desired field does not yet exist in ChilliDB, it can be created on-the-go by selecting "New" and providing a name and data type for the new field.

4. Verify Data and Run: Click on Verify Data to initiate the validation process. Upon successful mapping, the verification will display an 'OK' result. In case of incorrect mapping or data type discrepancies, the verification will indicate a ‘Fail’ result.
Ensure that all mandatory fields are correctly filled. It is essential to adhere to the appropriate data type of each field for successful verification. Once the verification is passed, click ‘Run’ and import the data into ChilliDB.

Important: The mandatory fields for the Contact Module and Organisation Module, along with their corresponding data types, are as follows:
Contact Module
· Identifier (Integer data type)
· Forename (Text data type)
· Surname (Text data type)
· Organisation Name (Text data type)
Note: Separate contact names into individual fields, such as First Name (Forename) and Surname, to match ChilliDB's separate required fields for contact information.
Organisation Module
· Organisation Name (Text data type)
Note: If the Organisation Categorisation is not provided, ‘Other’ is selected. It can be updated later if needed.
Importing Data with the Advanced Data Loader
The Advanced Data Loader offers the flexibility to import data into Contact, Organisation, Note, Client Administration, or other custom modules. After selecting the Data Loader option, ChilliDB will redirect users to the Standard Data Loader page. To access the Advanced Data Loader, click on "Show advanced option."

The benefits of the Advanced Data Loader include the ability to avoid duplicated records using External Identifier, Internal Identifier, and Unique Fields.

· External Identifier: Use the External Identifier to avoid duplication by ensuring it is unique within user’s database. This distinctive field allows users to create new records or update existing ones. When creating a new record, select an External Identifier not present in the database to prevent duplicates. When updating records, using the unique External Identifier ensures only the intended record is modified without affecting other data entries.
· Internal Identifier: The Internal Identifier serves as a unique field exclusively within the ChilliDB database, ensuring each module record has its distinct identifier. When creating new records, use a completely new and unique module identifier to avoid duplicate entries. When updating existing records, use the module identifier associated explicitly with the record intended to be modified.
Internal Identifiers are unique values assigned to each record by the system. Users can extract these identifiers by navigating to the Advanced Search feature for the desired module, selecting respective "Identifiers" as the display column, and exporting them in the desired format.

For instance, when updating contacts using internal identifiers, users can navigate to the Contact module's Advanced Search. Here, users can select "Contact Identifier" as one of the display columns and proceed to export and update the desired contact records.
· Unique Fields: Designated as unique fields within each module, these attributes ensure no two records share the same combination of values. When creating a new record, verify that the values for unique fields do not already exist in the database to prevent duplicate entries. When updating existing records, unique fields precisely identify the record requiring modification, preventing unintended changes to unrelated data.
Follow these steps to use the Advanced Data Loader:
1. Choose the Module: Depending on users requirements, select the desired module for data import.
2. Avoid Duplication: Select the desired option to avoid duplication - External Identifier, Internal Identifier, or Unique Fields.

3. Upload the Data: Click on the "Choose File" button to browse and select the desired CSV, XML, XLS, or XLSX file from the computer.
Note: If CSV file is being used to import the data, please refer here for best practises on the format.
4. Match Field from File with ChilliDB Field: Click on Load Field Names to associate the appropriate columns from the uploaded file with the corresponding fields in the module.
Users can also create and save data mappings that enable the users to load only the required fields from the file. Additionally, the users can load their saved data mappings to match their fields quickly and more efficiently.


Note: In case the desired field does not yet exist in ChilliDB, users can create it on-the-go by selecting "New" and providing a name and data type for the new field.
5. Verify Data and Run: Click on 'Verify Data' to initiate the validation process. Upon successful mapping, the verification will display an 'OK' result. In case of incorrect mapping or data type discrepancies, the verification will indicate a ‘Fail’ result.

Important: Ensure that all mandatory fields are correctly filled and adhere to the appropriate data type of each field for successful verification. Once the verification is passed, users can click ‘Run’ and import their data into ChilliDB.

Comments